

It's Pom Pom Time

Would you like to learn how to make a teeny tiny pom pom to increase the cuteness of your latest make? They're a perfect addition for your latest pair of shorty socks, baby beanie or to make a fun garland, so let us show you how!
What you will need
- Yarn (the finer the better, try 4ply or 8ply wool)
- A fork
- Scissors (the sharper they are, the easier)
- Small amount of water

Now here's what you do!
Cut a length of yarn approximately 15-20cm long, and set it aside.

Now with the ball of yarn, wrap the thread around and around the tines of a fork.

Keep going until there is a good amount of yarn wrapped, but you may need to make a couple of pom poms to work out just how much to wrap for your ideal pom. Now you can cut the thread that is attached to the ball.
Take the shorter length of yarn that we cut first, and dip it in some water. I know, I know, this sounds weird, but it actually makes tying the knots much easier, as they tend not to loosen as easily when wet. Try this when making pom poms or tassels of any size!
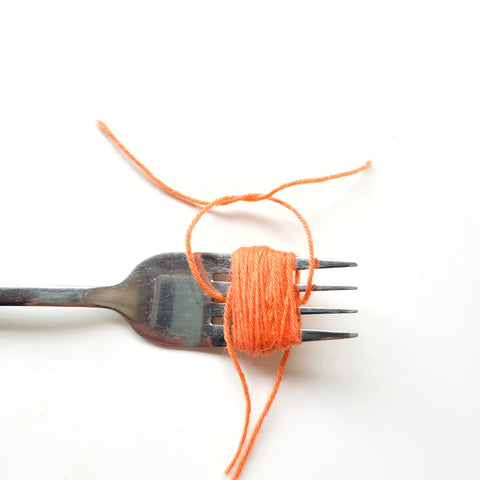
Tie firmly and securely around the middle of your pom, between the tines as shown.
Then slide off the end of the fork, and cut through all the little loops.
Now give your pom pom a good trim. This makes ALL the difference so do not skip it! And make sure to keep the two long ends you tied it off with attached if you are planning to tie your new pom onto something.

If your item is likely to be washed semi-regularly, then you may want to make your pom pom detachable. We like to thread or hook those long ties through the fabric of our project, and tie them on with a snug bow hidden on the inside of the work. That way, you can simply undo the bow to remove the pom pom before putting it in the washing machine!

All of the tips in this tutorial apply to any size of pom pom, and our favourite way of making larger ones is with a Pom Pom Maker like this one. Happy pom pom-ing!
